


 New
New


 Play QuickTime version
  Play Flash version
Watch
Watch jQuery Infinite Carousel screencast (Alternative flash version)
QuickTime version is approximately 70Mb, flash version is streaming.
View the demo used in the screencast

Understanding the Effect
As with any complicated effect, I always start by looking at the DOM in Firebug and interact with the effect, watching for what changes take effect in the DOM.
What I noticed was the (rendered) DOM structure for the list of images was different to the delivered DOM (i.e. the original markup sent). This means that there’s some significant initialisation code running. This isn’t unexpected for an Apple effect, but there were big clues in to how to create this effect in the difference.
Most importantly the list of images (in a <ul> element) had additional <li> elements at the start of the list and at the end of the list. There were two types: clone and empty.
The second big clue was the number of cloned elements on the end of the list: it matched the number of visible items in the carousel.
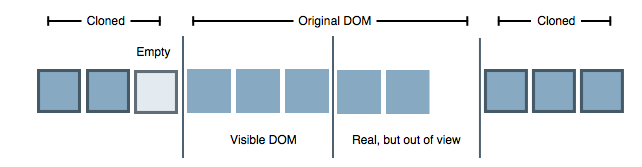
In the diagram below I’ve tried to outline what’s cloned in the list, and show what’s visible. You can see how the list shows 3 items at once, but there’s 5 items in total. So the first cloned section (at the start of the list) contains two clones and a single empty clone. The end of the list has 3 clones – which represents real items 1-3:
The Trick
Aside from building the DOM with the cloned nodes, the real trick is in the final panel of list items appearing. Because we’ve cloned the start of the list to the end of the list, when we scroll off the last items, it looks like we’ve looped back round. Once the animation completes, we change the scrollLeft position back to the real first items.
This scrollLeft isn’t visible to the user since the overflow is hidden, and so it creates the effect of being infinitely sliding from left or right (since it also works the other way around).
Markup
Remembering that we want the effect to work without JavaScript turned on, we’re going to use a pattern that we use fairly often for effects that scroll: overflows.
The default will be the overflow is visible, and we’ll use JavaScript to change the element to overflow: hidden.
<div class="infiniteCarousel">
  <div class="wrapper">
    <ul>
      <li>...</li>
      <li>...</li>
      <li>...</li>
    </ul>
  </div>
</div>
The CSS has been marked up in a way that the overflow is visible to start off with, and that the individual <li> elements are the same fixed width. This is necessary to ensure that we always show complete images in the visible part of the carousel.
jQuery
Replicating the Effect
This is a reasonably advanced effect so we need to plan carefully what we’re trying to achieve:
- Markup that works without JavaScript (done!)
- Initialisation & capture the height and width of the first carousel item (required for calculations)
- Create empty list items to pad to fill every page
- Generate cloned items on the start and end of the list
- Adjust the scroll left position to show the real first item
- Create goto method that supports forward and backwards
- Generate the next/prev links & bind goto calls
The completed example is also available if you want to skip through each step.
Initialisation
We’re going to write the code as a plugin so we can release it out to the wild at some later point. So this follows the typical plugin pattern:
(function ($) {
  $.fn.myPlugin = function () {
    return this.each(function () {
      // plugin code
    };
  };
})(jQuery);
This step is used to initialise the plugin and capture all the variables we need to create this effect. This includes:
- jQuery instance of the overflow element
- Hiding the overflow
- jQuery instance of the list
- jQuery instance of the list items
- The first item and it’s width
- Number of visible items we can fit in the carousel (rounded up via
Math.ceil) - Current page (defaults to 1) and the number of pages (rounded up)
var $wrapper = $('> div', this).css('overflow', 'hidden'),
  $slider = $wrapper.find('> ul'),
  $items = $slider.find('> li'),
  $single = $items.filter(':first'),

  // outerWidth: width + padding (doesn't include margin)
  singleWidth = $single.outerWidth(),

  // note: doesn't include padding or border
  visible = Math.ceil($wrapper.innerWidth() / singleWidth),
  currentPage = 1,
  pages = Math.ceil($items.length / visible);
Padding with Empty Items
During the screencast I said that we’re making use of the repeat function from another tutorial – however that was wrong! I must have used it for something else! None the less, here is the repeat function, which we put outside of the plugin since it’s a utility function:
function repeat(str, n) {
  return new Array( n + 1 ).join( str );
}
The repeat function simple uses and array hack to repeat any string n times.
When we create the empty padding, we need to use modulus to work out how many new empty items we need to fill every page of our carousel with an item:
if (($items.length % visible) != 0) {
  $slider.append(repeat('<li class="empty" />', visible - ($items.length % visible)));
  $items = $slider.find('> li');
}
Notice that we reinitialise the $items variable. This is to ensure it contains all of the items, including our newly created empty items.
Generating Clones
As per the diagram in the introduction, we need to clone the last page of items to the start of the list, and the first page of items to the end of the list. These will be the items that we slide on to before we flip the scrollLeft position (as per the trick above).
$items.filter(':first').before($items.slice(-visible).clone().addClass('cloned'));
$items.filter(':last').after($items.slice(0, visible).clone().addClass('cloned'));
$items = $slider.find('> li'); // reselect
We’re making using the slice method that jQuery has. Notice that we first use it with a negative number:
$items.slice(-visible)This means to take the last n items off the end of $items. Otherwise we have to pass the start and end point, so the second instance we’re saying from the start, 0, and the third as the method is zero-based indices.
Reset Scroll Left
Since we’ve created the clones at the start of the list, we need to shift the scroll left back to the real element, otherwise it would look like the carousel is sitting on the last page.
$wrapper.scrollLeft(singleWidth * visible);Go To Method
The gotoPage method will handle going forward and backwards and handle jumping several pages at a time.
We’re going to use the animate method and only animate the scrollLeft so that it smoothly scrolls. We could add custom easin if we wanted at a later date.
We need to establish the following:
- Direction we’re going to slide
- Number of pages to slide
- The relative scroll left value
Once the animation has completed, we also need to maintain the currentPage variable we created on initialisation.
If the page number is greater than the number of pages (i.e. we’re on our cloned first page), then reset the scroll left to the real first page, and set the page number to 1.
Equally if we have hit the beginning of the list (i.e. we’re showing the cloned last page), then we reset the scroll left to the real last page, and set the page number to the total number of pages.
function gotoPage(page) {
  var dir = page < currentPage ? -1 : 1,
    n = Math.abs(currentPage - page),
    left = singleWidth * dir * visible * n;

  $wrapper.filter(':not(:animated)').animate({
    scrollLeft : '+=' + left
  }, 500, function () {
    if (page == 0) {
      $wrapper.scrollLeft(singleWidth * visible * pages);
      page = pages;
    } else if (page > pages) {
      $wrapper.scrollLeft(singleWidth * visible);
      page = 1;
    }

    currentPage = page;
  });

  return false;
}
Navigation buttons
Finally we need to add the buttons or links to page through the carousel and bind the gotoPage call.
We’re also going to create a custom goto event that allows us to also jump to any page:
$wrapper.after('<a class="arrow back"><</a><a class="arrow forward">></a>');
$('a.back', this).click(function () {
return gotoPage(currentPage - 1);
});
$('a.forward', this).click(function () {
return gotoPage(currentPage + 1);
});
// this currently refers to the element the plugin was bound to
$(this).bind('goto', function (event, page) {
gotoPage(page);
});Demo
That’s it. It’s a fairly complicated plugin as J4D demos go. There is also the jCarousel plugin that you could use (though I’m not sure if it has infinite scrolling) – but obviously the idea here is to show you how it all comes together.
Check out the demo, view the source, have a play!
You should follow me on Twitter here I tweet about jQuery amongst the usual tweet-splurges!