


 New
New


 Play QuickTime version
  Play Flash version
Background
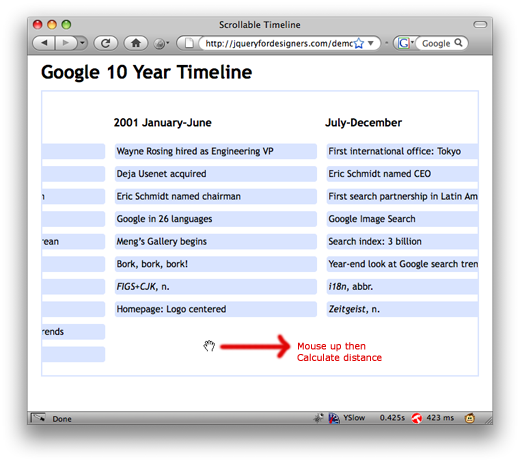
The first is a scrollable timeline. A couple of readers requested a demo of how Plurk’s browse timeline works. In addition, in the last month, Google released a 10 year timeline – so I wanted to show how this works.
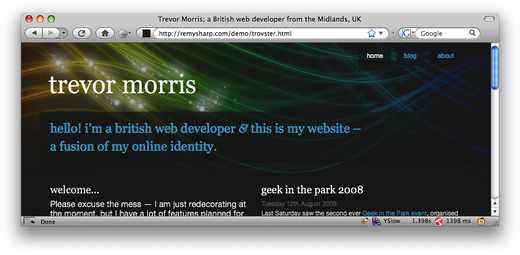
The second was a request from Trevor Morris who’s involved with/runs Geek in the Park. He asked whether the techniques I used in a jQuery marquee plugin I wrote recently could be used to smooth out CPU spikes that were occurring on his site when the header pattern flowed (see example below)
Watch
Part 1: Scrollable Timeline
Watch the scrollable timeline screencast (alternative flash version)
QuickTime version is approximately 60Mb, flash version is streaming.
View the demo and source code used in the scrollable timeline screencast
Part 2: Trovster’s Header Effect
Watch the Trovster’s header effect screencast (alternative flash version)
QuickTime version is approximately 45Mb, flash version is streaming.
View the demo and source code used in the Trovster’s header effect screencast
Scrollable Timeline
For the scrollable timeline I wanted to support both the Plurk version where the user could use their mouse wheel to scroll and the Google version where they could click and drag.
I’ve taken a large chunk of Google’s history to demonstrate the effect.
We set up the page by creating a wrapping div that has overflow: auto; (which we’ll change to overflow: hidden; using jQuery later on). The inner element, the ul in this particular case, is styled to have a width that can accommodate all the nested lis side by side without wrapping on to a ‘new line’ (this is done by floating the lis left and giving them a defined width).
Understanding the Problem
The task is such:
- Capture the mouse down event and track the current scroll position and the X co-ordinate of the click.
- When the mouse moves, and it’s down, scroll the element by the distance moved from the original mouse down.
- When the mouse moves out of the window, trigger a fake mouse up (or cancel the captured down event).
CSS
I won’t cover all the CSS used, only the key style:
#timeline {
  height: 375px; /* fixed */
  overflow: auto; /* changed to hidden via JavaScript */
}

.tl-events { /* the UL */
  width: 11800px; /* the width required to hold all the info */
}

.tl-events li {
  float: left; /* allows the lis to stack against eachother */
  width: 300px;
}
jQuery
This is the full code listing used in the demo.
We attach 3 built in mouse events: mousedown, mouseup and mousemove. Then we add the jQuery mousewheel plugin before changing the overflow CSS:
// when the DOM is ready...
$(document).ready(function () {
  $('#timeline').mousedown(function (event) {
    // attach 3 pieces of data to the #timeline element
    $(this)
      .data('down', true) // a flag indicating the mouse is down
      .data('x', event.clientX) // the current mouse down X coord
      .data('scrollLeft', this.scrollLeft); // the current scroll position

    // return false to avoid selecting text and dragging links within the scroll window
    return false;
  }).mouseup(function (event) {
    // on mouse up, cancel the 'down' flag
    $(this).data('down', false);
  }).mousemove(function (event) {
    // if the mouse is down - start the drag effect
    if ($(this).data('down') == true) {
      // this.scrollLeft is the scrollbar caused by the overflowing content
      // the new position is: original scroll position + original mouse down X - new X
      // I'd like to see if anyone can give an example of how to speed up the scroll.
      this.scrollLeft = $(this).data('scrollLeft') + $(this).data('x') - event.clientX;
    }
  }).mousewheel(function (event, delta) {
    // now attaching the mouse wheel plugin and scroll by the 'delta' which is the
    // movement of the wheel - so we multiple by an arbitrary number.
    this.scrollLeft -= (delta * 30);
  }).css({
    'overflow' : 'hidden', // change to hidden for JS users
    'cursor' : '-moz-grab' // add the grab cursor
  });
});

// finally, we want to handle the mouse going out of the browser window and
// it not triggering the mouse up event (because the mouse is still down)
// but it messes up the tracking of the mouse down
$(window).mouseout(function (event) {
  if ($('#timeline').data('down')) {
    try {
      // *try* to get the element the mouse left the window by and if
      // we really did leave the window, then cancel the down flag
      if (event.originalTarget.nodeName == 'BODY' || event.originalTarget.nodeName == 'HTML') {
        $('#timeline').data('down', false);
      }
    } catch (e) {}
  }
});
Trovster’s Header Effect
Using the this.scrollLeft DOM attribute again, we can create a completely different effect.
This effect and design was created by Trevor Morris, but the first version he had took up a lot of CPU by changing the CSS left position on the ‘rainbow’ image.
The version I cover in the screencast uses overflows and absolute positioning to keep the CPU usage and the effect (still) smooth in addition to working to make it appear the same if JavaScript is turned off.
Markup
The extra empty div is the wide element and the div#rainbow is the element with the overflow that will scroll.
<div id="headerEffect">
  <div id="rainbow"><div></div></div>
  <div id="swirl"></div>
</div>
CSS
In addition to the following CSS, I also hand coded the PNG transparency for IE6 to work when JavaScript is disabled.
#headerEffect {
  position: absolute;
  width: 100%;
  height: 400px;
  overflow: hidden;
  top: 0; /* make sure IE stretches it properly */
  left: 0;
}

#rainbow {
  height: 400px;
  width: 100%;
  overflow: hidden;
}

#rainbow div {
  height: 400px;
  width: 3312px; /* nice big width that ensures it repeats */
  background: url(/css/img/header.colour.3.png) repeat-x scroll -20% 0;
}

#swirl {
  background: url(/css/img/header.swirl.png) no-repeat scroll 50% 0;
  height: 400px;
  width: 100%;
  position: absolute; /* places the swirl *over* the rainbow */
  top: 0;
  left: 0;
}
In addition I’ve included IE6 specific styles:
<!--[if lte IE 6]>
<style type="text/css" media="screen">
/* I've put the alpha transparency in the CSS so as to support non JS enabled visits */
#swirl {
  background-image: none;
  filter: progid:DXImageTransform.Microsoft.AlphaImageLoader(src='http://www.trovster.com/css/img/header.swirl.png', sizingMethod='scale');
}
</style>
<![endif]-->
JavaScript
Note that I’ve called this section JavaScript rather than jQuery, since we’re dealing with the scrollLeft property on the div#rainbow element we only ever need jQuery for the ready event:
$(document).ready(function () {
  // capture the rainbow element
  var rainbow = document.getElementById('rainbow'),
    lastPos, // stores the last scrollLeft position
    width = 1656; // the repeating point on the background

  // we always reset when the page reloads so that the background is always the same
  rainbow.scrollLeft = width;

  // use an interval to scroll the rainbow
  setInterval(function () {
    // subtract to make the background scroll from left to right
    rainbow.scrollLeft -= 5;

    // if we've hit the beginning then the lastPos will be the same as the scrollLeft
    if (lastPos == rainbow.scrollLeft) {
      // reset
      rainbow.scrollLeft = width;
    }

    lastPos = rainbow.scrollLeft;
  }, 100); // the combination of milliseconds
});
Taking it Further
I would love to see what else you can do: the Coda Slider is another example of the overflow and scrollLeft being used in the same way to create a completely different effect.
What other ways can the overflow/scrollLeft combo be used?
You should follow me on Twitter here I tweet about jQuery amongst the usual tweet-splurges!