Background
Coda is one of the new web development tools for the Mac - and it's popular amongst designers and developers I know. Panic (the developers of Coda) are also known for their sharp design.
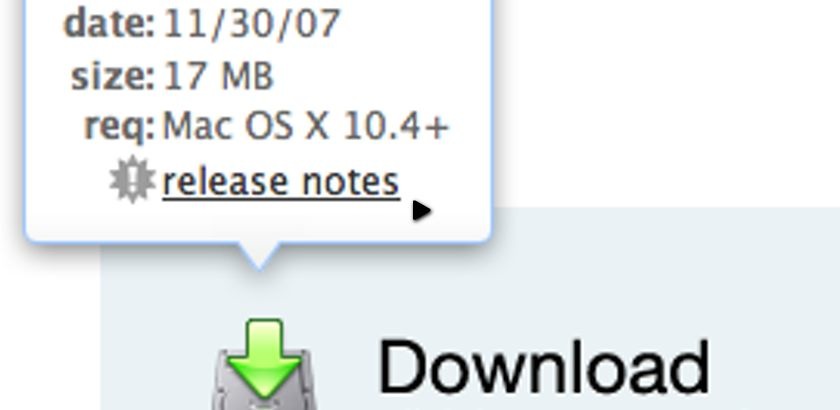
In particular, Jorge Mesa writes to ask how to re-create their 'puff' popup bubble shown when you mouse over the download image.
In essence the effect is just a simple combination of effect, but there's a few nuances to be wary of.

How to Solve the Problem
To create the puff popup bubble effect, we need the following:
- Markup that assumes that JavaScript is disabled. It would be fair to say that the popup would be hidden from the CSS.
- The hidden popup, correctly styled for when we make it appear.
- jQuery to animate the puff effect on
mouseoverandmouseout.
The biggest trick to be wary of is: when you move the mouse over the popup, this triggers a mouseout on the image used to trigger the popup being shown. I'll explain (carefully) how to make sure the effect doesn't fail in this situation.
I’ve provided a screencast to walk through how create this functionality. Details on how and what I used can be found below.
Watch the coda bubble screencast (alternative flash version)
(QuickTime version is approx. 23Mb, flash version is streaming)
View the demo and source code used in the screencast
HTML Markup
For the purpose of reusability, I've wrapped my 'target' and 'popup' in a div. The target is the element which the user must mouseover to show the popup.
<div class="bubbleInfo">
<img class="trigger" src="http://mysite.com/path/to/image.png" />
<div class="popup">
<!-- your information content -->
</div>
</div>
CSS
There's very little to the minimum required CSS. Of course, how you markup your bubble will change this, and the screencast uses the version from the Coda web site, so there's a considerable amount of CSS to style the bubble.
The minimum I recommend for the example is:
.bubbleInfo {
position: relative;
}
.popup {
position: absolute;
display: none; /* keeps the popup hidden if no JS available */
}
This way we can absolutely position the popup against the trigger.
jQuery
To create the effect, we need to run the following animation on the popup element:
Mouse Over
- On
mouseover: reset the position of the popup (required because we're floating upwards as we puff away). - Animate the popup's opacity from 0 to 1 and move it's CSS top position by negative 10px (to move upwards).
- If the
mouseoveris fired again, and we're still animating - ignore. - If the
mouseoveris fired again, and the popup is already visible - ignore.
Mouse Out
- Set a timer to trigger the popup hide function (this prevents accidentally moving out of the 'active' area).
- If a timer is set (to hide), reset the timer (thus only allowing one hide function to fire).
- Once timed out, animiate the popup's opacity from 1 to 0 and move it's CSS top position by negative 10px (to float upwards away).
- Set the appropriate flags to indicate the popup is now hidden.
The 'Trick'
There was one piece of tricky logic that initially I couldn't work out. Each time I moved the mouse over the popup, it would fire a mouseout on the trigger element - which would hide the popup. This is an undesirable bug.
There may be a another way around this, and from what I can tell, the Coda site developers didn't solve it this way - but here's the solution:
You need to clear the timer set in the mouseout (point 1 above) in the mouseover. This completely solves the problem.
Complete Source Code
Here's the complete source code for the effect, including comments throughout the code to explain what each block is doing.
$(function () {
$('.bubbleInfo').each(function () {
// options
var distance = 10;
var time = 250;
var hideDelay = 500;
var hideDelayTimer = null;
// tracker
var beingShown = false;
var shown = false;
var trigger = $('.trigger', this);
var popup = $('.popup', this).css('opacity', 0);
// set the mouseover and mouseout on both element
$([trigger.get(0), popup.get(0)]).mouseover(function () {
// stops the hide event if we move from the trigger to the popup element
if (hideDelayTimer) clearTimeout(hideDelayTimer);
// don't trigger the animation again if we're being shown, or already visible
if (beingShown || shown) {
return;
} else {
beingShown = true;
// reset position of popup box
popup.css({
top: -100,
left: -33,
display: 'block' // brings the popup back in to view
})
// (we're using chaining on the popup) now animate it's opacity and position
.animate({
top: '-=' + distance + 'px',
opacity: 1
}, time, 'swing', function() {
// once the animation is complete, set the tracker variables
beingShown = false;
shown = true;
});
}
}).mouseout(function () {
// reset the timer if we get fired again - avoids double animations
if (hideDelayTimer) clearTimeout(hideDelayTimer);
// store the timer so that it can be cleared in the mouseover if required
hideDelayTimer = setTimeout(function () {
hideDelayTimer = null;
popup.animate({
top: '-=' + distance + 'px',
opacity: 0
}, time, 'swing', function () {
// once the animate is complete, set the tracker variables
shown = false;
// hide the popup entirely after the effect (opacity alone doesn't do the job)
popup.css('display', 'none');
});
}, hideDelay);
});
});
});
Taking it Further
This effect could be perfected by changing the initial reset (popup.css()) code to read from the trigger element and approximate it's position. In my example, I've hardcoded it because I only have one on the page - but you may want to use this effect several times across your page.
March 3, 2008 at 17:27
Great tutorial! The timeout, cleartimeout stuff has always confused me a bit, and this info will come in handy if I ever need to make a series of drop downs for navigation!
March 3, 2008 at 19:19
Very nice tutorial. I am definitely going to put this to use on some sites of mine. By the way, spelling mistake - "Taking it Future" - I think it should say "Further"
March 3, 2008 at 23:44
@Bryan - cheers for the correction.
March 4, 2008 at 00:35
Great tut. Always learn something new from you.
March 4, 2008 at 03:51
Thanks a lot for this tutorial! ;)
March 4, 2008 at 10:50
Wonderful effect!
I wish that the transparency works in IE. Please provide a solution for this.
March 4, 2008 at 11:03
Re: the transparency in IE.
This is only a problem due to the images used from Coda's web site. I'm sure it's something to do with the way they were created. If you plan to use pngs on your own solution, I recommend using the pngFix jQuery plugin as it handles inline images and background transparency.
March 6, 2008 at 14:43
would have been way easier if you used :animated and :visible instead of this beingShown stuff
March 6, 2008 at 17:51
@Georgi - I wouldn't have said it makes it much easier, because you need to be careful to flip the
display: nonestyle again on once the animation is complete, sinceopacity: 0doesn't doesn't flag as :not(:visible) (note that the code above does do this).None the less, it does away with two variables - which I like.
If anyone is interested, you can strip away the
beingShownandshownvariable and replace:with:
To make use of jQuery's custom selectors.
Cheers Georgi.
March 13, 2008 at 04:10
I would like to follow your suggestions about taking this one step further but not sure how to proceed as easy as it might be since this is all very new to me. Can you please provide sample since I would love to use this on several times across one page? Thanks Uri
April 2, 2008 at 19:37
Isn't that is easier to do with Web Designer Wall's technique: http://www.webdesignerwall.com/demo/jquery/animated-hover2.html
April 9, 2008 at 04:52
Wow, what a great tutorial. Thanks for taking the time to do this.
April 11, 2008 at 08:21
@Jon - you're almost right. Web Designer Wall's technique is easy - but it doesn't replicate the effect the way I wanted to (also - their tutorial came out at the same time!).
It's definitely less code to have it appear and disappear to the same spot. To create the "puff" effect, it needs to go up, and up. Thanks for the link though :-)
April 14, 2008 at 00:26
Thanks for the great tutorial! The only problem I see is that anytime after you have rolled over it for the first time, when you mouse over the area where your pop-up will appear, it activates it. This is true on your demo as well. Is there anyway to make it only pop-up when you mouse over just the link? Thanks!
April 14, 2008 at 07:40
@Steve - thanks for pointing that out. I had updated the code in the tutorial to set the
popup.css('display', 'none');in the callback, but I didn't in the example. That's now been updated, and doesn't trigger when you hover over where the popup used to be.April 14, 2008 at 12:37
Thanks for the quick reply! That worked great. One more thing, any way to prevent the text flicker as the bubble is being activated? Thanks again.
April 16, 2008 at 13:12
Its great tut. Im going to buy Mac and cant stand to use Coda. thx for this post, greetings, agencja modelek
April 16, 2008 at 23:01
"you may want to use this effect several times across your page."
Does anyone know how to do this? I tried to hack something together, but with my limited skills it came out a mess. Can anyone share some code where they were able to do this effect several times across one page? Much appreciate!
Great tutorial. Thanks for posting it.
April 16, 2008 at 23:07
@Carla - I posted it as a plugin that can be used on with multiple bubbles:
http://plugins.jquery.com/project/bubble-puff
You need to point the selector at a div that contains the trigger element and the actual popup. Let me know how you get on.
April 16, 2008 at 23:35
@Remy - Any chance you could post a small example snippet to show how to use the revised plug-in code? :)
April 18, 2008 at 10:47
Nice tutorial.
Can the containing div contain more than one trigger, each of which triggers a popup occupying the same space?
To explain:
http://www.olisindri.com/myndir/2popups.gif
The yellow trigger being the active / moused over one.
April 20, 2008 at 20:24
Wow, I always loved and really wants to immitates coda's bubble/slide etc. Its what inspired me on my portfolio, http://fedmich.com/works/
April 26, 2008 at 20:13
hi, i translate your code to prototype/script.aculo.us if anyone want it just write me a mail!
April 30, 2008 at 14:24
Wonderful Tutorial.
Regards Team Derive Host
May 3, 2008 at 17:59
Hi, great tutorial Remy.
I'm trying to center the bubble according to the width of the trigger. Do you have an idea how I could do this? Thanks
May 7, 2008 at 08:51
Cool, but the transparency falls over in IE7 too! You get big black outline around the popup.
May 13, 2008 at 13:33
Not working in ie6 :/
May 13, 2008 at 21:33
@Tim + @Adam - sorry about that. In the former instance, the images are taken directly from Coda's web site. When you make your own I sure you'll use alpha transparencies on the images.
May 15, 2008 at 07:47
Hi, very interessant plugin, what a work !
I'm a newbie in jQuery and I'm trying to use the Bubble script for multiple bubbles in the same page.
But like Carla, it cames out a mess. Could it be possible to find a extended version of this tutorial which helps me to manage multiple bubbles?
May 17, 2008 at 15:16
This it what I'm talking about...great tutorial I was wondering how Coda did it.
May 19, 2008 at 06:45
Hi I found this tip UI awesome, so I have tried to make this tip dynamic for end users. but i have strut in between, Download zip from here http://www.2shared.com/file/3307138/2577de6b/Coda_tip.html
guys is there any possibility of dynamiszing those code which i have uploaded.
Regards, Manish Bansal
May 31, 2008 at 17:31
Hi, I've used this tutorial to create a contact pop-up, if you want to take a look, here is the link (the website is in portuguese) E-Serviços.net, the effect is on mouseover the text in bottom link ("Contacto")
June 4, 2008 at 07:40
Here's an interesting bug I found, transparency will never work on this example as transparent pngs and animation cause a black border to appear where the shadow effect should be. Once the animation is complete the transparency should work but due to your use of the setInterval function it never stops animating perse and therefore never gets to render the transparency correctly in IE7. Anyone know of a fix?
June 5, 2008 at 18:51
Again thanks man very useful tutorial, very helpful and easy to follow
June 6, 2008 at 12:55
REMY: can you post a snippet on how to use your plugin? I've loaded it in, I have a class=bubble and inside that trigger and popup... nada... the previous code works...
Thanks
June 6, 2008 at 12:59
@Craig - try this:
June 10, 2008 at 23:04
FYI - a quick dirty way to create a "showDelay", wrap the mouseover stuff inside a setTimeout function too:
hideDelayTimer = setTimeout(function () { // reset position of info box beingShown = true; info.css({ top: -15, left: 150, display: 'block' }).animate({ top: '-=' + distance + 'px', opacity: 1 }, time, 'swing', function() { beingShown = false; shown = true; }); }, hideDelay);I was using multiple bubbles on a page and this prevents massive bubbleage when you quickly mouseover all of them.
June 11, 2008 at 04:25
Thanks for this tutorial, I can't wait to try it out!
Mike
June 11, 2008 at 15:56
Is it just me or your code with jquery 1.2.6 version causes javascript error ?
June 13, 2008 at 21:43
it was just me ^^
June 21, 2008 at 20:12
This is some real snazzy stuff.
Thanks for the tutorial Remy. I'll be hanging around here more often now that I've found this site =)
R.
June 30, 2008 at 19:47
This is a great tutorial! Thanks!!
I have a small problem though. I'm using the same trigger on 3 different pages and the placement is slightly different. Is there any way to position the popup bubble through CSS instead of jQuery, but still use the same jQuery code? I just need a unique ID for each bubble and I'm having problems...