


 New
New


 Play QuickTime version
  Play Flash version
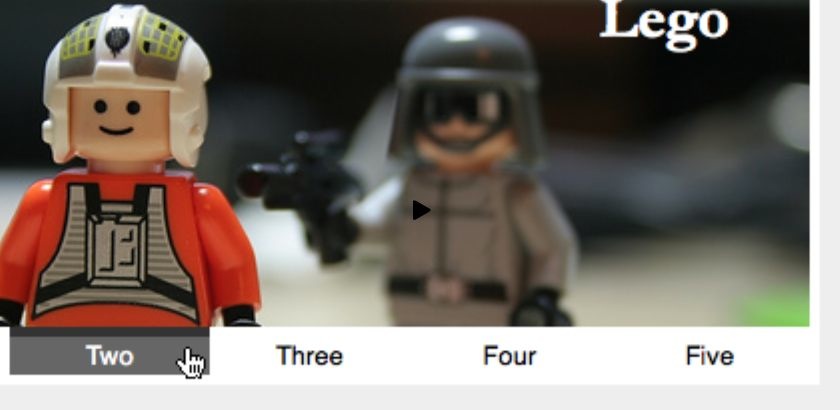
Watch
Watch BBC Radio 1 Zoom Tabs screencast (Alternative flash version)
QuickTime version is approximately 60Mb, flash version is streaming.
View the demo used in the screencast
BBC Radio 1 effect

The first thing I noticed about the effect is that it’s done in Flash. I’m a big believer in knowing where Flash has it’s place: the high end of the effects within browsers (amongst other places).
Equally though, I can how this effect can be achieved using JavaScript and it not taking too much toll on the browser.
There’s three things that are happening in this effect:
- When you roll over the image, it zooms out slightly to reveal more of the image. Notice that it also keeps the top position static.
- The navigation slides in to view from the bottom of the box, and mousing over the link will trigger showing a different image.
- The images automatically change with a swipe effect.
I’m going to set aside the 3rd effect for now (perhaps I’ll do a screencast on it in the future) and focus on the first two.
Deconstructing the effects
The first thing I want to aim for is that the layout works without CSS, and the technique works without JavaScript enabled.
Roll over zoom
The only way we can get an image to appear to zoom is by having the actual image element and increasing the height and width. However, I’m going to create these image elements on the fly because when my page runs without JavaScript I want the images to appear in the background of the panels.
I’m still in two minds as to whether this should be a background image. The image certainly doesn’t add any value from a content point of view, so without CSS I think it looks right, but I’d be open to hear your opinions.
When these images are created they need to have their size increased by a defined percentage (which we’ll make a parameter), so that when we roll over, the image is resized down to it’s original size, giving the impression of a zoom out.
Given that we are going to stretch these images across the total height and width of the panel, it also means we need to wrap the content that’s initially in the panel in an element with a higher z-index to make sure the actual content can still be seen and used.
Navigation slide up
By default the jQuery slideUp method hides content, and slideDown reveals the content by expanding element downwards.
We need our navigation bar to reveal upwards. To achieve this we just need to position the navigation absolutely (which also helps our non-JavaScript version of the page), and use the animate method to animate the height from zero to the real height of the navigation item – which we’ll capture during initialisation.
HTML & CSS
The HTML for the solution is a pretty simple tab system, with the only slight exception that our tab panels are wrapped in a div:
<div class="zoomoutmenu">
  <ul class="tabs">
    <li><a href="#one">One</a></li>
    <!-- etc -->
  </ul>
  <div class="panels">
    <div id="one" class="panel">
      <h2>Garden life</h2>
    </div>
    <!-- etc -->
  </div>
</div>
As for the CSS, as an experiment, I’ve used EMs throughout the CSS – there’s no reason why you can’t use PXs. I was just interested in seeing the example being zoomed by the browser. I’ve set the body font-size to 62.5% so that 1em is equal to 10px.
The only slight deviation away from a traditional tab set up is the navigation is set at the bottom, and because I know with JavaScript we’re going to use absolutely positioned image elements, the ul.tabs has the following CSS position absolute and a z-index:
.tabs {
  position: absolute;
  bottom: 0;
  z-index: 1;
}
Aside: Tabs without JavaScript
If you open look at the solution now, with JavaScript disabled, you’ll see that because we’ve wrapped our tab panels in a div with overflow: hidden, we’ve now created a tabbing system that works entirely without JavaScript.
If you wanted to use this in production: you need to be wary of ensuring the height of the panels is equal (since it is just overflowing) – otherwise this is a fairly clean way to tab content without the need for JavaScript
jQuery
There’s four jobs our zoom tabs (for want of a better name) needs to achieve:
- Convert background images to foreground images and apply styling to give them a default state of zoomed in
- Zoom the image inwards using an animation
- Slide the navigation up and down out of view
- Hovering over the navigation will change the tabs
I’m going to give you each part separately, then you can see the whole thing put together in the completed example.
Converting background images
As I’m trying to make a plugin, I’m saying that I don’t know anything about the images or height or width of the panels.
We need to loop through each panel, take the background image and create a new image with that url. Once that new image is loaded, we’ll pull out the height and width, work out the zoomed in height and width (which will be a percentage larger than the initial size), strip the panel of it’s background image and then insert the new image in to the panel. Phew! That’s sounds like a lot!
$.fn.zoomtabs = function (zoomPercent, easing) {
  if (!zoomPercent) zoomPercent = 10;

  return this.each(function () {
    var $zoomtab = $(this);
    var $tabs = $zoomtab.find('.tabs');

    var panelIds = $tabs.find('a').map(function () {
      return this.hash;
    }).get().join(',');

    var $panels = $(panelIds);
    var images = [];

    $panels.each(function () {
      var $panel = $(this),
        bg = $panel.css('backgroundImage').match(/urls*(["']*(.*?)['"]*)/),
        img = null;

      if (bg !== null && bg.length && bg.length > 0) {
        bg = bg[1];
        img = new Image();

        $panel.find('*').wrap('<div style="position: relative; z-index: 2;" />');
        $panel.css('backgroundImage', 'none');

        $(img).load(function () {
          var w = this.width / 10;
          var wIn = w / 100 * zoomPercent;
          var h = this.height / 10;
          var hIn = h / 100 * zoomPercent;
          var top = 0;

          var fullView = {
            height: h + 'em',
            width: w + 'em',
            top: top,
            left: 0
          };

          var zoomView = {
            height: (h + hIn) + 'em',
            width: (w + wIn) + 'em',
            top: top,
            left: '-' + (wIn / 2) + 'em'
          };

          $(this).data('fullView', fullView).data('zoomView', zoomView).css(zoomView);

        }).prependTo($panel).css({'position' : 'absolute', 'top' : 0, 'left' : 0 }).attr('src', bg);

        images.push(img);
      }
    });
  });
};
Let’s take a look at what’s happening in this code.
First of all, we’re dynamically collecting all the panel element ids using the map trick that I showed you in the last J4D episode:
var panelIds = $tabs.find('a').map(function () {
  return this.hash;
}).get().join(',');

var $panels = $(panelIds);
The panelIds variable contains a string such as: #one,#two,#three – since this is the hash on the href the tab links, which we immediately capture as a jQuery instance.
Next, we loop through the $panels to convert the background images to foreground images.
bg = $panel.css('backgroundImage').match(/urls*(["']*(.*?)["']*)/),This is a regular expression that captures the background image. It’s written to try to handle different cases in that the url could be plain, wrapped in single quotes or it could be wrapped in double quotes.
We test if we did successfully find the background image (which you may argue we don’t need since this plugin has a very specific purpose), and if it was found, we’ll create a new image.
Before we hook in to the image load event, we do two things: 1) remove the background image, and 2) wrap the panels contents in a div:
$panel.find('*').wrap('<div style="position: relative; z-index: 2;" />');This is to ensure the contents appears above the image – specifically notice the z-index: 2.
The next line is 4 chained commands:
- Bind a load event to the image
- Prepend the image in to the panel – i.e. make it the first element
- Set the position of the image – which is overwritten as soon as the image is loaded (which I’ll come on to)
- Finally set the url of the image, which will in turn trigger the load event
The very last action we perform is to capture the image in the images array. This will be used later to zoom the images in and out.
Image load event
The image load event has 2 purposes:
- Set the zoomed in position via CSS (actually the last thing to happen)
- Store the CSS states of the full view and the zoomed view
Using a bit of math, we’re working out what the zoomed state is, and then both variables are stored against the image element using jQuery’s data function:
$(this).data('fullView', fullView).data('zoomView', zoomView).css(zoomView);This means we can retrieve this data later on.
Zoom the image
I’ve created a separate function to handle the zooming in and out of the image. This is because it will be called from two different places with only one single different – which variable to use to set the CSS – either ‘fullView’ or ‘zoomView’ which we set just above.
function zoomImages(zoomType, speed) {
  $(images).each(function () {
    var $image = $(this);
    if ($image.is(':visible')) {
      $image.stop().animate($image.data(zoomType), speed, easing);
    } else {
      $image.css($image.data(zoomType), speed);
    }
  });
}
In this function we loop through the images that we captured in the images array. From there we say if the image is visible (i.e. it’s the currently active panel), then animate it’s CSS properties (either zooming out or in – this is defined by the zoomType).
If the image isn’t visible, we need to just change the CSS properties without the animation. This is because when the user switches to a different tab, the image must be in the same zoomed state as all the other panels.
Slide the navigation up and down
Next we need to say, if the user hovers over the whole thing, we want to:
- Trigger the
zoomImagesfunction - Slide the navigation up, or down if they’re hovering away
$zoomtab.hover(function () {
  zoomImages('fullView', speed);
  $tabs.stop().animate({ height : height }, speed, easing);
}, function () {
  zoomImages('zoomView', speed);
  $tabs.stop().animate({ height : 0 }, speed, easing, function () {
    $(this).hide().dequeue();
  });
});
The hover over is fairly simple, we stop the effect from running on the $tabs to prevent it from jumping and down madly, and we animate the height to a pre-captured height (which would happen in the initialisation phase).
Hover off is slightly different. We do the same, animating down to zero, but then we use a callback function to hide the navigation, this is to ensure it’s completely hidden once the effect has finished (because in my example, I’m using a border, and animating the height to zero would leave the border visible).
Hovering over navigation
Finally, since I’m replicating the effect on the BBC (certainly 2/3rds of it), I want to hover over the tabs to trigger the panel to switch. However, I don’t want it to trigger straight away, say if I accidently hover over a tab – so I’m using a bit of simple hover intent (you could well use the full plugin to achieve this though):
var hoverIntent = null;
$tabs.find('a').hover(function () {
  clearTimeout(hoverIntent);
  var el = this;
  hoverIntent = setTimeout(function () {
    $panels.hide().filter(el.hash).show();
  }, 100);
}, function () {
  clearTimeout(hoverIntent);
}).click(function () {
  return false;
});
I’ve added a simple 100ms timeout to say if the user is over the tab, now show that panel.
Since I’m using setTimeout, I need to capture a copy of the current tab link, because the this keyword inside of the setTimeout is actually a reference to the window object.
Wrap up
With all my code now in place (there’s a few initialisation items I’ve not covered in this tutorial, but should be covered in the screencast the effect is now ready to be used.
Have a play with the zoom tabs effect, let me know what you think – particularly so if you think there’s a better name for it!
You should follow me on Twitter here I tweet about jQuery amongst the usual tweet-splurges!